Sunday, March 31, 2019

Step by Step Oracle 18c Database Installation on Linux with Screenshots


Create a staging directory on your server and download the files from OTN. Make sure to set the profiles perfectly for the database and you do have all the directories set with right permissions. Check the RPM’s based on your operating system stipulations. In this scenario, we will see how to install 18.0.0.0.0 on OEL 7. Lets get started.


[Sajid@SajidServer~]$ cd /usr/stage
[Sajid@SajidServer stage]$ ls -ltr
-rwxrwxr-x  1 oracle oinstall 4564649047 Jan 23 16:16 LINUX.X64_180000_db_home.zip

[Sajid@SajidServer stage]$ unzip LINUX.X64_180000_db_home.zip

Make sure you have your VNC or XMING set up properly and now invoke the runInstaller

[Sajid@SajidServer database]$ ./runInstaller


At this stage, we have successfully completed the 18c database install on OEL7. Thanks for Visiting!!!


Monday, February 4, 2019

Apply the latest PSU 12.1.0.2.190115 (Jan 2019) for Oracle RAC Database

       In this article, I will be sharing my knowledge on applying the latest Oracle patch set update 12.1.0.2.190115 (released in January 2019) on RAC cluster. Do refer to readme file before executing the PSU.


If you need further step by step approach for applying the patch in detail, do refer to Apply the latest PSU5 for 12.1.0.2 RAC Database (here) (Scroll down) in my blog.

########
Error 1:
########

OPATCHAUTO-72053: Analysis for the patches failed.

OPATCHAUTO-72053: Command execution failed.
OPATCHAUTO-72053: Please check the summary for more details.

########

Error 2:
########

OPATCHAUTO-72088: OPatch version check failed.

OPATCHAUTO-72088: OPatch software version in homes selected for patching are different.
OPATCHAUTO-72088: Please install same OPatch software in all homes.
OPatchAuto failed.

opatchauto failed with error code 42


##########

Solution:
##########

Patch 27547329, Patch 28259833 and Patch 28729169 requires minimum OPatch version 12.2.0.1.13. Make sure to download  p6880880_180000_Linux-x86-64.zip in both Grid and Oracle homes. So that, you are on the latest opatch version and move forward with patching.


After that applied the patch and it was successful.


[root@sajidserver01 OPatch]# ./opatchauto apply /usr/staging/28813884


OPatchauto session is initiated at Mon Jan  21 13:52:25 2019


System initialization log file is /usr/12.1.0/grid/cfgtoollogs/opatchautodb/systemconfig2019-01-21_01-52-26PM.log.


Session log file is /usr/12.1.0/grid/cfgtoollogs/opatchauto/opatchauto2019-01-21_01-52-30PM.log

The id for this session is ZRI4

Executing OPatch prereq operations to verify patch applicability on home /usr/oracle/product/12.1.0

Patch applicability verified successfully on home /usr/oracle/product/12.1.0


Verifying SQL patch applicability on home /usr/oracle/product/12.1.0

SQL patch applicability verified successfully on home /usr/oracle/product/12.1.0


Executing OPatch prereq operations to verify patch applicability on home /usr/12.1.0/grid

Patch applicability verified successfully on home /usr/12.1.0/grid


Preparing to bring down database service on home /usr/oracle/product/12.1.0

Successfully prepared home /usr/oracle/product/12.1.0 to bring down database service


Bringing down database service on home /usr/oracle/product/12.1.0

Following database has been stopped and will be restarted later during the session: sajiddb
Database service successfully brought down on home /usr/oracle/product/12.1.0


Bringing down CRS service on home /usr/12.1.0/grid

Prepatch operation log file location: /usr/12.1.0/grid/cfgtoollogs/crsconfig/hapatch_2019-01-21_01-55-08PM.log
CRS service brought down successfully on home /usr/12.1.0/grid


Start applying binary patch on home /usr/oracle/product/12.1.0

Binary patch applied successfully on home /usr/oracle/product/12.1.0


Start applying binary patch on home /usr/12.1.0/grid

Binary patch applied successfully on home /usr/12.1.0/grid


Starting CRS service on home /usr/12.1.0/grid

Postpatch operation log file location: /usr/12.1.0/grid/cfgtoollogs/crsconfig/hapatch_2019-01-21_01-59-21PM.log
CRS service started successfully on home /usr/12.1.0/grid


Starting database service on home /usr/oracle/product/12.1.0

Database service successfully started on home /usr/oracle/product/12.1.0


Preparing home /usr/oracle/product/12.1.0 after database service restarted

No step execution required.........


Trying to apply SQL patch on home /usr/oracle/product/12.1.0

SQL patch applied successfully on home /usr/oracle/product/12.1.0

OPatchAuto successful.


--------------------------------Summary--------------------------------


Patching is completed successfully. Please find the summary as follows:


Host:sajidserver01

SIDB Home:/usr/oracle/product/12.1.0
Version:12.1.0.2.0
Summary:

==Following patches were SKIPPED:


Patch: /usr/staging/28813884/26983807

Reason: This patch is not applicable to this specified target type - "oracle_database"

Patch: /usr/staging/28813884/28729220

Reason: This patch is not applicable to this specified target type - "oracle_database"


==Following patches were SUCCESSFULLY applied:


Patch: /usr/staging/28813884/28729169

Log: /usr/oracle/product/12.1.0/cfgtoollogs/opatchauto/core/opatch/opatch2019-01-21_01-55-30PM_1.log

Patch: /usr/staging/28813884/28729213

Log: /usr/oracle/product/12.1.0/cfgtoollogs/opatchauto/core/opatch/opatch2019-01-21_01-55-30PM_1.log


Host:sajidserver01

SIHA Home:/usr/12.1.0/grid
Version:12.1.0.2.0
Summary:

==Following patches were SKIPPED:


Patch: /usr/staging/28813884/26983807

Reason: This patch is already been applied, so not going to apply again.


==Following patches were SUCCESSFULLY applied:


Patch: /usr/staging/28813884/28729169

Log: /usr/12.1.0/grid/cfgtoollogs/opatchauto/core/opatch/opatch2019-01-21_01-56-18PM_1.log

Patch: /usr/staging/28813884/28729213

Log: /usr/12.1.0/grid/cfgtoollogs/opatchauto/core/opatch/opatch2019-01-21_01-56-18PM_1.log

Patch: /usr/staging/28813884/28729220

Log: /usr/12.1.0/grid/cfgtoollogs/opatchauto/core/opatch/opatch2019-01-21_01-56-18PM_1.log


OPatchauto session completed at Mon Jan  21 14:01:18 2019

Time taken to complete the session 8 minutes, 54 seconds

Happy Patching and Learning.

Thursday, January 31, 2019

Install MySQL on Linux

                    Will be discussing on installing latest MySQL open source relational database system version 8.0 on OEL7. You can download the MySQL software from https://dev.mysql.com/downloads/repo/yum/ or Oracle Metalink website. Let's get started, we can split this installation into three parts as below:

1. Download MySQL software
2. Secure MySQL Installation
3. Create the Database

[root@sajidserver~]#yum install mysql-community-server

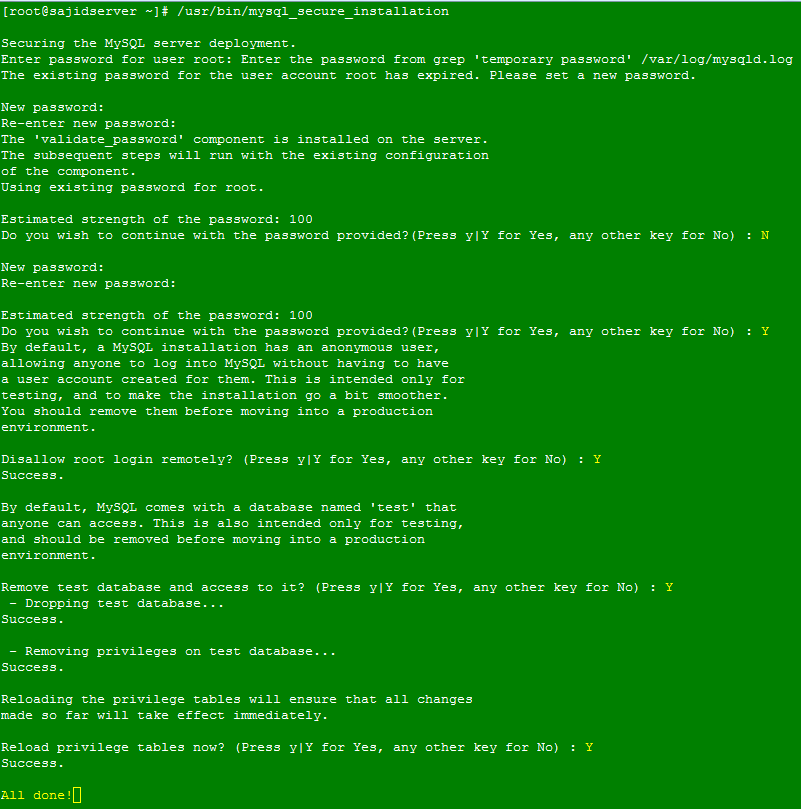
Look for the temporary password, which you need it for secure installation.

[root@sajidserver~]#grep 'temporary password' /var/log/mysqld.log
2019-01-05T00:02:55.258804Z 5 [Note] [MY-010454] [Server] A temporary 
password is generated for root@localhost: zytrk7-j<


Now let's connect to MySQL and create the database.


Friday, November 30, 2018

Installation of GoldenGate Monitoring Agent 12.2


      Oracle GoldenGate Monitor is used to monitor the status of the Goldengate targets like Manager, Extract and Replicat from Oracle Enterprise Manager. Download Oracle GoldenGate Monitor 12.2.1.2.0 from OTN site, you even need minimum java version 8 (1.8) to have Oracle GoldenGate Monitor installed using Oracle Universal Install. For installing Oracle Golden gate 12c (http://sajidkhadarabad.blogspot.com/2016/03/install-oracle-golden-gate-12c.html

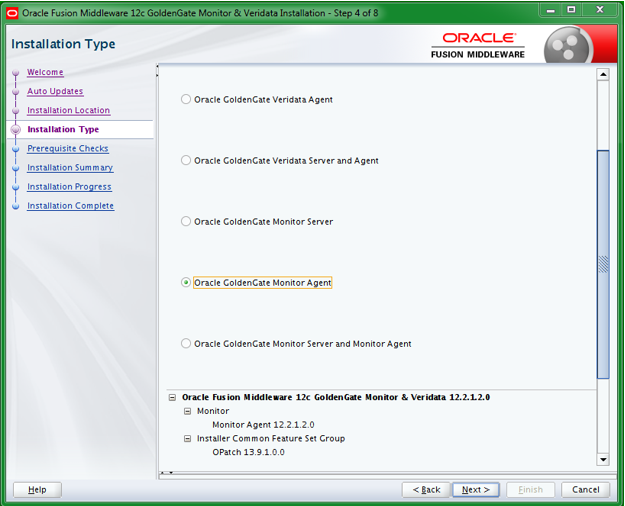
You can install Oracle GoldenGate Monitor by Oracle Universal Install or through a silent install. I chose Oracle Universal Install and below are the steps for the install.


Sajidserver01:oracle$ ls -ltr

-r-xr-xr-x 1 oracle oinstall 430387063 Oct 14 04:33 fmw_12.2.1.2.0_ogg.jar
-rwxr-xr-x 1 oracle oinstall 430166267 Mar 17 15:30 fmw_12.2.1.2.0_ogg_Disk1_1of1.zip

Sajidserver01:oracle$ java -jar -Xmx1024m /usr/oracle/gg12c/stage/fmw_12.2.1.2.0_ogg.jar

Launcher log file is /tmp/OraInstall2018-11-16_12-43-53PM/launcher2018-11-16_12-43-53PM.log.
Extracting files.....
Starting Oracle Universal Installer

Checking if CPU speed is above 300 MHz.   Actual 2400.000 MHz    Passed

Checking monitor: must be configured to display at least 256 colors.   Actual 16777216    Passed
Checking swap space: must be greater than 512 MB.   Actual 16383 MB    Passed
Checking if this platform requires a 64-bit JVM.   Actual 64    Passed (64-bit not required)
Checking temp space: must be greater than 300 MB.   Actual 65485 MB    Passed

Preparing to launch the Oracle Universal Installer from /tmp/OraInstall2018-11-16_12-43-53PM

Log: /tmp/OraInstall2018-11-16_12-43-53PM/install2018-11-16_12-43-53PM.log
Logs are located here: /tmp/OraInstall2018-11-16_12-43-53PM.


Feed in the location where you want to have monitoring agent installed and make sure to create the directory earlier.


Oracle GoldenGate Monitor is successfully installed!!!

Wednesday, October 31, 2018

TFA-00104 TFA-00002 Oracle Trace File Analyzer (TFA) is not running


                   Oracle Trace File Analyzer (TFA) is a one-stop tool to diagnose all of your system. You can download latest TFA from (Doc ID 1513912.1). I was working on upgrading TFA from 18.1.1 to 18.3.3. Before upgrade TFA was up and running in a healthy state, once I have invoked upgrade happen to run into issues TFA-00104 and TFA-00002, below is the fix for it.


Everytime it will be different error across each server, even though the file exists on the server with right permissions.

ERROR: /usr/tfa/sajidserver02/tfa_home/internal/.pidfile does not exists
ERROR: /usr/tfa/sajidserver02/tfa_home/internal/cached_kv.out does not exists

TFA-00104 Cannot establish connection with TFA Server. Please check TFA Certificates
TFA-00002 Oracle Trace File Analyzer (TFA) is not running


Take it easy as its just a tool, we can directly opt for the new install. Below are the steps which I have performed on the server.


Successfully done with TFA install."Happy Analysing".

Note:
You can check version with using below command:
[root@sajidserver01 bin]# ./tfactl print status

.--------------------------------------------------------------------------------------------------.
| Host     | Status of TFA | PID   | Port | Version    | Build ID             | Inventory Status   |
+----------+---------------+-------+------+------------+----------------------+--------------------+
|sajidsrv01| RUNNING       | 27385 | 5000 | 18.3.3.0.0 | 18330020181005054218 | COMPLETE           |
'----------+---------------+-------+------+------------+----------------------+--------------------'


Friday, September 28, 2018

Validate Database 12c Data Guard


                   Switchover and failover using dgmgrl earlier in 11g, was able to provide an ample amount of information. But with 12c version Oracle introduced a new procedure validate database, which helps to provide DBA with lots of information related to pre- switchover/failover tasks.


                  Managed by Clusterware is added in 12cR2, which was not available in earlier 12CR1. Similarly Automatic Diagnostic 
Repository Errors is removed in 12cR2 which was available earlier in 12cR1. Few more parameter are added, it's difficult to get into nitty-gritty details about each and every property. All in all great job done by Oracle savvy engineers to pinpoint specifics related to pre-switchover tasks.

I happen to test it and run it across 12.2.0.1.0 database.


                 Even though we do get a detailed information prior to hand before the switchover. Database alert log and dataguard alert log will come to rescue at the time of database switchover or failover task.


Friday, August 31, 2018

Deinstall 12.2 Grid Infratructure

                    Last month I have updated the blog with deinstall 12c database (http://sajidkhadarabad.blogspot.com/2018/07/deinstall-12c-database.html), today lets see how we can deinstall grid infrastructure 12.2.0.1. It is imperative to clean the grid software properly, if you are trying to install the new grid software on the existing machine, if not you will be seeing more discrepancies with the new install.

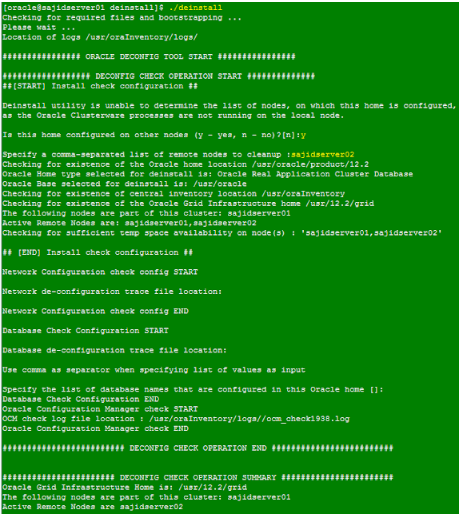
      Let's start working on the process, make sure you set your environment profiles right. I am performing this on a two node RAC cluster, make sure you read and answer the prompts right.


[grid@sajidserver01 deinstall]$ pwd
/usr/12.2/grid/deinstall
[grid@sajidserver01 deinstall]$ ls -ltr
-rwxr-x--- 1 grid oinstall 11313 Jun 18 15:56 deinstall


The deconfig command below can be executed in parallel on all the remote nodes. 

Execute the command on  the local node after the execution completes on all the remote nodes.

Run the following command as the root user or the administrator on node "sajidserver02".

/usr/12.2/grid/crs/install/rootcrs.sh -force -deconfig -paramfile "/tmp/deinstall2018-06-22_12-29-38PM/response/deinstall_OraGI12Home1.rsp"

Run the following command as the root user or the administrator on node "sajidserver01".

/usr/12.2/grid/crs/install/rootcrs.sh -force  -deconfig -paramfile "/tmp/deinstall2018-06-22_12-29-38PM/response/deinstall_OraGI12Home1.rsp" -lastnode

Press Enter after you finish running the above commands


 It will deinstall the software but the directories will still be existing across all the nodes. Which you need to manually delete.


Deinstall 12c Database

I will be discussing on deinstalling the 12c database, if you would like to drop the database check this (http://sajidkhadarabad.blogspot.com/2016/06/delete-or-drop-oracle-database-12c.html). Make sure you set your Oracle database profiles properly. This one is particularly for 12cR2 RAC database, the process will be the same for even 12cR1 and 11G databases.

[oracle@sajidserver01 deinstall]$ pwd
/usr/oracle/product/12.2/deinstall
[oracle@sajidserver deinstall]$ ls -ltr deinstall
-rwxr-x--- 1 oracle oinstall 11323 Jul 19 11:59 deinstall

In the below screenshot, it will ask you to feed in the details after few steps. I have highlighted them for easy understanding.


It will deinstall the software but the directories will still be existing across all the nodes. Which you need to manually delete.


Friday, May 18, 2018

OMS Responding Slow 13c

           OMS 13c was responding slow, happen to hear the same complaint from fellow DBA's. I was like, I wish there was some turbo or magic button to make it fast, jokes aside. Started drilling down into logs, happen to find strange errors from the OMS alert logs as mentioned below:

Look up for SIGTERM in the alert log, to be more specific it is signal termination.


####
Fix:
####
[oracle@sajidserver ohs1]$ pwd
$OMS_HOME/gc_inst/user_projects/domains/GCDomain/config/fmwconfig/components/OHS/ohs1

Take the backup of the file.
[oracle@sajidserver ohs1]$cp httpd.conf httpd.bkp_date

[oracle@sajidserver ohs1]$ vi httpd.conf

look for mpm_prefork_module and mpm_worker_module, they will look like below. 


Change the highlighted line in yellow to /u01/locks. Make sure you have created the locks directory in /u01 with oracle account and 775 permissions.  Save the changes and exit the file.

Last and final step bounce the OMS.

[oracle@sajidserver logs]$ emctl stop oms -all
[oracle@sajidserver logs]$ emctl start oms

I have seen the OMS was responding fast enough. I happen to go through Oracle Metalink note (Doc ID 2117861.1), the same fix even works for OMS 12c too. Hope it will be even helpful to you folks too.

Sunday, April 22, 2018

IOUG Conference 2018 Vegas

              Here am Vegas, early morning 5 AM, super excited to know tons of new things related to Oracle, Artificial Intelligence, AWS, Google Cloud Platform and many more new technologies. Praise to Lord and heartily thanks to American Eagle Outfitters.


Friday, March 2, 2018

Emocmrsp is missing in Opatch utility (12cR2)


                  Emocmrsp was available under $ORACLE_HOME/OPatch/ocm/bin in 12cR1 and 11G databases. It is deprecated now in new Opatch 12cR2. It is discussed in Oracle metalink notes (Doc ID 1591616.1).


                When I have downloaded the latest p6880880_122010_Linux-x86-64.zip and applied it, there was no emocmrsp file. The best part is, you don't need to generate it anymore and at the same time do not even need to add a tail to your opatchauto apply command.


The new feature of the Opatch utility 12cR2 gives you a clear description of OPatchauto session completed and time taken to complete the session like below:


OPatchauto session completed at Fri Mar  2 12:07:08 2018
Time is taken to complete the session 1 minute, 36 seconds

Happy Patching and learning :).