Sunday, December 1, 2019

GRANT ALL in Amazon RDS for MySQL

I was working on creating a user in MySQL database hosted on Amazon Relational Database Service (RDS) – AWS. Happen to run into an issue when granting privileges to the MySQL user, which was never an issue earlier. But that's okay, as long we have the fix.

mysql> CREATE USER 'sajid'@'%' IDENTIFIED BY 'sajid';
Query OK, 0 rows affected (0.00 sec)

mysql> GRANT ALL ON *.* TO 'sajid'@'%';
ERROR 1045 (28000): Access denied for user 'sajid'@'%' (using password: YES)

But the above command works perfectly as expected, without any errors in on-premise servers. I have tried different ways, but the below fix works, rather than *.*. It has to be percent sign enclosed in the backquote as below.

mysql> GRANT ALL ON `%`.* TO sajid@`%`;
Query OK, 0 rows affected (0.00 sec)

Friday, November 1, 2019

OEM Agent Timezone Change


On November 3, 2019 daylight saving time ends. If you are an on-call DBA, your phone will be going fiasco late at night with all the OEM alerts triggering at once. Keep the commands handy which will get you some sleep. Here I will be changing the timezone to America/New_York from a different timezone, you can edit it as per your environmental setup.

[oracle@sajidserver]$ Set the agent bash profile
[oracle@sajidserver]$ more /usr../config/emd.properties|grep agentTZRegion
agentTZRegion=US/Pacific
[oracle@sajidserver]$ emctl stop agent
[oracle@sajidserver]$ export TZ=America/New_York
[oracle@sajidserver]$ emctl resetTZ agent

It will give a detailed output, about what the next steps that need to be executed and from the OEM repository database.


[oracle@sajidserver]$ emctl start agent
[oracle@sajidserver]$ emctl upload agent
[oracle@sajidserver]$ emctl status agent

[oracle@sajidserver]$ more /usr../config/emd.properties|grep agentTZRegion
agentTZRegion=America/New_York

Now login into the OEM Repository database.

SYS>alter session set container=SAJID_PDB;
Session altered.

SYS>alter session set current_schema = SYSMAN;
Session altered.

SYS>exec mgmt_target.set_agent_tzrgn('<Hostname>:3872','America/New_York');
PL/SQL procedure successfully completed.

SYS>commit;
Commit complete.

Check the Timezone now in OEM Repository Database it might have been reflected.

SYS>select target_name, timezone_region from sysman.mgmt_targets where target_name='<Hostname>:3872';

TARGET_NAME        TIMEZONE_REGION
-----------        ---------------
<Hostname>:3872    America/New_York

Hopefully OEM alerts should get subsided after this :).


Wednesday, October 2, 2019

OEM Agent Diagnose for Status Pending (Post Blackout)

Sometimes OEM agents will be in status pending status, after ending the blackouts related to maintenance (operating system, Networking, Database, Application). One of my colleagues calls it out as Wonky state. The steps you need to perform to bring it in a green and clean state to start monitoring your databases are as below.


[oracle@sajidserver emd]$ emctl stop agent
[oracle@sajidserver emd]$ cd $AGENT_HOME/sysman/emd
[oracle@sajidserver emd]$ rm -rf state/*
[oracle@sajidserver emd]$ rm -rf upload/*
[oracle@sajidserver emd]$ rm -rf collection/*
[oracle@sajidserver emd]$ rm agntstmp.txt
[oracle@sajidserver emd]$ rm blackouts.xml
[oracle@sajidserver emd]$ emctl clearstate agent
[oracle@sajidserver emd]$ emctl start agent

You can see agents starts normally, but emctl status agents spit out the below error with proper reasoning.


[oracle@sajidserver emd]$ emctl status agent
Blocked Reason: Agent is out-of-sync with repository. This most likely means that the agent was reinstalled or recovered. Please contact an EM administrator to unblock the agent by performing an agent resync from the console.

And even emctl upload agent fails:

[oracle@sajidserver emd]$ emctl upload agent
Oracle Enterprise Manager Cloud Control 13c Release 2
Copyright (c) 1996, 2016 Oracle Corporation.  All rights reserved.
---------------------------------------------------------------
EMD upload error: full upload has failed: The agent is blocked by the OMS. Agent is out-of-sync with repository. This most likely means that the agent was reinstalled or recovered. Please contact an EM administrator to unblock the agent by performing an agent resync from the console. (AGENT_BLOCKED)

Now drill down into the specific target as below and hit Resynchronization. After that follow the screen with unblocking the agent and submitting a confirmation job as below screens.


Give it a few minutes, then your agent will appear in up and green status as below.


Happy Monitoring :).


Monday, August 19, 2019

ERROR 1238 (HY000): Variable is a read only variable in MySQL Database


Few times when we want to increase the performance of MySQL database, by tweaking certain MySQL variables as suggested by MySQL documentation. We sometimes notice we are not able to make the proper modification with some errors. It's good to have a prevailing knowledge about which parameters can be changed dynamically and for those not, can align with different team to get downtime.

You can refer to https://dev.mysql.com/doc/refman/5.7/en/innodb-parameters.html, about the parameters that can be changed dynamically for version pertaining to MySQL database version 5.7.

Error:

mysql> set global innodb_open_files=600;
ERROR 1238 (HY000): Variable 'innodb_open_files' is a read only variable

Fix:

1. Edit the changes related to the parameter in my.cnf file, at the operating system level.
2. Bounce MySQL services. So that changes are persistent.

Monday, July 29, 2019

Install MySQL Enterprise Monitor step by step with screenshots

In this post will cover the step by step screenshots to install MySQL Enterprise Monitor (MEM) version 8.0.3, which will help us for troubleshooting and notifying any critical issues related to MySQL databases.

Download the latest software related to MySQL Enterprise Monitor (MEM) version 8.0.3 from Oracle Support site. You can install  MySQL Enterprise Monitor (MEM) using three ways:

1. Graphical User Interface (GUI)
2. Text-based
3. Unattended 

MySQL Enterprise Monitor 8.0.3 now supports MySQL 8, MySQL  Enterprise Monitor Agent, Data collection model, Graphs, Advisors and Query Analyzer have been updated, which will help to triage any MySQL issues more easily. Before the installation starts, have proper ports and firewalls ready for Tomcat server port, Tomcat SSL port and MySQL Database Port.

I have chosen the Graphical User Interface (GUI) and below are the step by step screenshots for the installation process.


At this stage, we are done with the installation of the MySQL Enterprise Monitor. Happy Monitoring!!!

Sunday, March 31, 2019

Step by Step Oracle 18c Database Installation on Linux with Screenshots


Create a staging directory on your server and download the files from OTN. Make sure to set the profiles perfectly for the database and you do have all the directories set with right permissions. Check the RPM’s based on your operating system stipulations. In this scenario, we will see how to install 18.0.0.0.0 on OEL 7. Lets get started.


[Sajid@SajidServer~]$ cd /usr/stage
[Sajid@SajidServer stage]$ ls -ltr
-rwxrwxr-x  1 oracle oinstall 4564649047 Jan 23 16:16 LINUX.X64_180000_db_home.zip

[Sajid@SajidServer stage]$ unzip LINUX.X64_180000_db_home.zip

Make sure you have your VNC or XMING set up properly and now invoke the runInstaller

[Sajid@SajidServer database]$ ./runInstaller


At this stage, we have successfully completed the 18c database install on OEL7. Thanks for Visiting!!!


Monday, February 4, 2019

Apply the latest PSU 12.1.0.2.190115 (Jan 2019) for Oracle RAC Database

       In this article, I will be sharing my knowledge on applying the latest Oracle patch set update 12.1.0.2.190115 (released in January 2019) on RAC cluster. Do refer to readme file before executing the PSU.


If you need further step by step approach for applying the patch in detail, do refer to Apply the latest PSU5 for 12.1.0.2 RAC Database (here) (Scroll down) in my blog.

########
Error 1:
########

OPATCHAUTO-72053: Analysis for the patches failed.

OPATCHAUTO-72053: Command execution failed.
OPATCHAUTO-72053: Please check the summary for more details.

########

Error 2:
########

OPATCHAUTO-72088: OPatch version check failed.

OPATCHAUTO-72088: OPatch software version in homes selected for patching are different.
OPATCHAUTO-72088: Please install same OPatch software in all homes.
OPatchAuto failed.

opatchauto failed with error code 42


##########

Solution:
##########

Patch 27547329, Patch 28259833 and Patch 28729169 requires minimum OPatch version 12.2.0.1.13. Make sure to download  p6880880_180000_Linux-x86-64.zip in both Grid and Oracle homes. So that, you are on the latest opatch version and move forward with patching.


After that applied the patch and it was successful.


[root@sajidserver01 OPatch]# ./opatchauto apply /usr/staging/28813884


OPatchauto session is initiated at Mon Jan  21 13:52:25 2019


System initialization log file is /usr/12.1.0/grid/cfgtoollogs/opatchautodb/systemconfig2019-01-21_01-52-26PM.log.


Session log file is /usr/12.1.0/grid/cfgtoollogs/opatchauto/opatchauto2019-01-21_01-52-30PM.log

The id for this session is ZRI4

Executing OPatch prereq operations to verify patch applicability on home /usr/oracle/product/12.1.0

Patch applicability verified successfully on home /usr/oracle/product/12.1.0


Verifying SQL patch applicability on home /usr/oracle/product/12.1.0

SQL patch applicability verified successfully on home /usr/oracle/product/12.1.0


Executing OPatch prereq operations to verify patch applicability on home /usr/12.1.0/grid

Patch applicability verified successfully on home /usr/12.1.0/grid


Preparing to bring down database service on home /usr/oracle/product/12.1.0

Successfully prepared home /usr/oracle/product/12.1.0 to bring down database service


Bringing down database service on home /usr/oracle/product/12.1.0

Following database has been stopped and will be restarted later during the session: sajiddb
Database service successfully brought down on home /usr/oracle/product/12.1.0


Bringing down CRS service on home /usr/12.1.0/grid

Prepatch operation log file location: /usr/12.1.0/grid/cfgtoollogs/crsconfig/hapatch_2019-01-21_01-55-08PM.log
CRS service brought down successfully on home /usr/12.1.0/grid


Start applying binary patch on home /usr/oracle/product/12.1.0

Binary patch applied successfully on home /usr/oracle/product/12.1.0


Start applying binary patch on home /usr/12.1.0/grid

Binary patch applied successfully on home /usr/12.1.0/grid


Starting CRS service on home /usr/12.1.0/grid

Postpatch operation log file location: /usr/12.1.0/grid/cfgtoollogs/crsconfig/hapatch_2019-01-21_01-59-21PM.log
CRS service started successfully on home /usr/12.1.0/grid


Starting database service on home /usr/oracle/product/12.1.0

Database service successfully started on home /usr/oracle/product/12.1.0


Preparing home /usr/oracle/product/12.1.0 after database service restarted

No step execution required.........


Trying to apply SQL patch on home /usr/oracle/product/12.1.0

SQL patch applied successfully on home /usr/oracle/product/12.1.0

OPatchAuto successful.


--------------------------------Summary--------------------------------


Patching is completed successfully. Please find the summary as follows:


Host:sajidserver01

SIDB Home:/usr/oracle/product/12.1.0
Version:12.1.0.2.0
Summary:

==Following patches were SKIPPED:


Patch: /usr/staging/28813884/26983807

Reason: This patch is not applicable to this specified target type - "oracle_database"

Patch: /usr/staging/28813884/28729220

Reason: This patch is not applicable to this specified target type - "oracle_database"


==Following patches were SUCCESSFULLY applied:


Patch: /usr/staging/28813884/28729169

Log: /usr/oracle/product/12.1.0/cfgtoollogs/opatchauto/core/opatch/opatch2019-01-21_01-55-30PM_1.log

Patch: /usr/staging/28813884/28729213

Log: /usr/oracle/product/12.1.0/cfgtoollogs/opatchauto/core/opatch/opatch2019-01-21_01-55-30PM_1.log


Host:sajidserver01

SIHA Home:/usr/12.1.0/grid
Version:12.1.0.2.0
Summary:

==Following patches were SKIPPED:


Patch: /usr/staging/28813884/26983807

Reason: This patch is already been applied, so not going to apply again.


==Following patches were SUCCESSFULLY applied:


Patch: /usr/staging/28813884/28729169

Log: /usr/12.1.0/grid/cfgtoollogs/opatchauto/core/opatch/opatch2019-01-21_01-56-18PM_1.log

Patch: /usr/staging/28813884/28729213

Log: /usr/12.1.0/grid/cfgtoollogs/opatchauto/core/opatch/opatch2019-01-21_01-56-18PM_1.log

Patch: /usr/staging/28813884/28729220

Log: /usr/12.1.0/grid/cfgtoollogs/opatchauto/core/opatch/opatch2019-01-21_01-56-18PM_1.log


OPatchauto session completed at Mon Jan  21 14:01:18 2019

Time taken to complete the session 8 minutes, 54 seconds

Happy Patching and Learning.

Thursday, January 31, 2019

Install MySQL on Linux

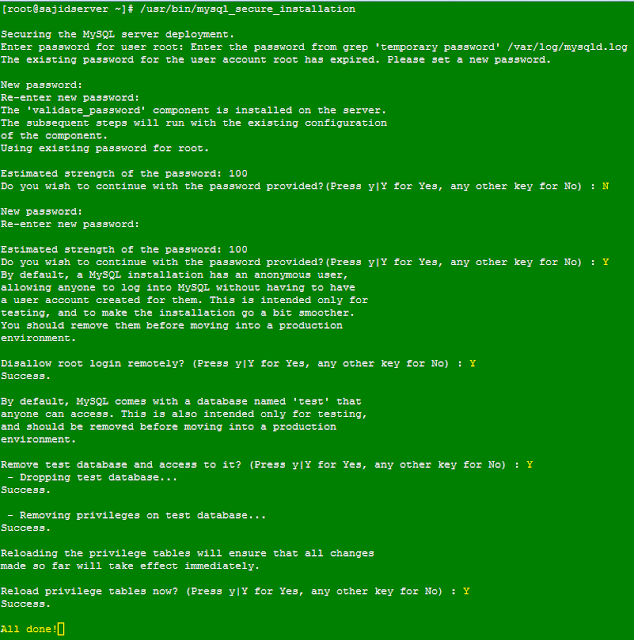
                    Will be discussing on installing latest MySQL open source relational database system version 8.0 on OEL7. You can download the MySQL software from https://dev.mysql.com/downloads/repo/yum/ or Oracle Metalink website. Let's get started, we can split this installation into three parts as below:

1. Download MySQL software
2. Secure MySQL Installation
3. Create the Database

[root@sajidserver~]#yum install mysql-community-server

Look for the temporary password, which you need it for secure installation.

[root@sajidserver~]#grep 'temporary password' /var/log/mysqld.log
2019-01-05T00:02:55.258804Z 5 [Note] [MY-010454] [Server] A temporary 
password is generated for root@localhost: zytrk7-j<


Now let's connect to MySQL and create the database.