Friday, December 4, 2015

DB Install on Exadata Machine using dbca 12c RAC Screenshots

Exadata Machines is about lightning fast processing of data. which comes up in different configuration based on client requirements you can make choice (Quarter Rack, Half Rack and Full rack). It has prodigious benefits related to processing huge volumes of data with customized architecture minimizing the IO with  intelligent software built in it. At present lets see how we can install new database on X3-2 with step by step screens.


To know your Exadata Machine version use the below command
[root@Sajidexa01 ~]# grep OneCommand /opt/oracle.SupportTools/onecommand/preconf.csv
# OneCommand,XXX,X3-2 Half Rack HC

Make sure to set the bash profiles properly and invoke dbca. The flash screen 12c appears


Select Create Database and hit Next

You can select between two options Create Database with Default option or Advanced Option. Lets see with first option in which you have literally less choices to make and comparatively easy to wrap up below is the screen for first option.


Now lets see the option with the Advanced Mode which I have used for this piece.


Select Configuration Type I have selected Admin Managed, you can even change it to Policy Managed once the build is done.


Give the Database Name. One thing in 12c  the database name should be between 1 to 30 characters.


Select the default settings and hit Next


Choose your option and hit Next


Choose the file location give the appropriate Diskgroup name and hit on Multiplex Redo Logs and Control Files and provide the Diskgroup names as per your requirement.


Enable the archivelog mode and give necessary Diskgroup name for it.


Go to each tab Memory, Sizing, Character Set and Connection Mode to make required changes. 


Look for the Customized Storage option and make your Redo Log Groups are set properly.


Look for the progress bar and you are done with Database Install. Yippee!!!!!


Wednesday, November 25, 2015

Mutipath Set UP for Oracle RAC ASM 12C step by step


Device Mapper provides I/O management and load-balancing for oracle devices including ASM and OCR/Voting disks. Mutipath is an essential piece for shared storage environments. To the end of this document you will see my disk are using a major cylinder number of 252, which means disk are properly configured with multipath. For each vendor it will change like for EMC it will be 120 and for other unix flavours it will be different number. Device Mapper includes four components :

  1. Mutipath Configuration Tool
  2. Mutipathd Deamon
  3. DM-Mutiptah Kernel Module
  4. kpartx Utility


Lets jump on to the working scenario for mutipath on ASM disks:

Once you use fdisk to create the necessary partitions and validated all the oracleasm RPMS are installed on RAC Servers.

[root@SajidServer01 ~]# ls -l /dev/mapper/mapth*
lrwxrwxrwx 1 root root       7 Nov 25 10:37 DISK01 -> ../dm-17
lrwxrwxrwx 1 root root       7 Nov 25 10:55 DISK01p1 -> ../dm-25
                       ||||||||
                       ||||||||
                       ||||||||=====>Output Truncated
                       ||||||||
                       ||||||||

[root@SajidServer01 ~]# egrep 'dm-17|dm-25' /proc/partitions
 252       17    7340032 dm-17
 252       25    7339008 dm-25

Now we need to run partprobe OS related command on all the existing nodes to make sure new partitons are available and visible on each and every node.

[root@SajidServer01 ~]# partprobe /dev/mapper/mapth [e,f,g,h,i]*

[root@SajidServer01 ~]# ls -l /dev/mapper/mapth [e,f,g,h,i]*
lrwxrwxrwx 1 root root       8 Nov 25 10:55 mpathe -> ../dm-10
lrwxrwxrwx 1 root root       7 Nov 25 10:37 mpathep1 -> ../dm-4
                       ||||||||
                       ||||||||
                       ||||||||=====>Output Truncated
                       ||||||||
                       ||||||||
Run the same  partprobe command on other nodes and do check the soft link is set as above.

Now you need to run oracleasm configure on each node to change the permissions of the disks from (root:root) to (grid:asmadmin)


[root@SajidServer01 ~]# /etc/init.d/oracleasm configure
Configuring the Oracle ASM library driver.

This will configure the on-boot properties of the Oracle ASM library
driver.  The following questions will determine whether the driver is
loaded on boot and what permissions it will have.  The current values
will be shown in brackets ('[]').  Hitting <ENTER> without typing an
answer will keep that current value.  Ctrl-C will abort.

Default user to own the driver interface []: grid
Default group to own the driver interface []: asmadmin
Start Oracle ASM library driver on boot (y/n) [n]: y
Fix permissions of Oracle ASM disks on boot (y/n) [y]:
Writing Oracle ASM library driver configuration:           [  OK  ]
Creating /dev/oracleasm mount point:                              [  OK  ]
Loading module "oracleasm":                                           [  OK  ]
Mounting ASMlib driver filesystem:                                [  OK  ]
Scanning system for ASM disks:                                      [  OK  ]


[root@SajidServer01 ~]# /etc/init.d/oracleasm start

Intializing the oracle ASMLIB driver:                             [  OK  ]
Scanning the system for Oracle ASMLib disk:                [  OK  ]

Note: We need to run this command on all the other nodes.

Now you need to update the /et/sysconfig/oracleasm on all the nodes file by changing only 2 paramters for using mutipath.

# ORACLEASM_SCANORDER: Matching patterns to order disk scanning
ORACLEASM_SCANORDER="/dev/mapper/*"

# ORACLEASM_SCANEXCLUDE: Matching patterns to exclude disks from scan
ORACLEASM_SCANEXCLUDE="sd"

Now reboot all the nodes to bring the changes in place and make sure the asmlib are loaded properly.

[root@SajidServer01 ~]# /etc/init.d/oracleasm status

Checking if ASM is loaded :  yes
Checking if /de/oracleasm is mounted: yes


[root@SajidServer01 ~]# lsmod | grep oracleasm
oracleasm           54341  1

Note: Check the above oracleasm status and lsmod on all the nodes of your clustered environments.

Now connect as Super User ROOT and execute the below commands only on Node1.

/usr/sbin/oracleasm createdisk DISK01 /dev/mapper/mapthep1
Marking disk "DISK01" as an ASM DISK:
/usr/sbin/oracleasm createdisk DISK02 /dev/mapper/mapthfp1
Marking disk "DISK02" as an ASM DISK:
/usr/sbin/oracleasm createdisk DISK03 /dev/mapper/mapthgp1
                       ||||||||
                       ||||||||
                       ||||||||=====>Output Truncated (Do it for all necessary disk and only on Node 1)
                       ||||||||
                       ||||||||


[root@SajidServer01 ~]# /etc/init.d/oracleasm listdisks
DISK01
DISK02
DISK03
DISK04
DISK05

[root@SajidServer01 ~]# /etc/init.d/oracleasm querydisks DISK01
Disk "DISK01" is a valid ASM diks

[root@SajidServer01 ~]# /etc/init.d/oracleasm querydisks DISK02
Disk "DISK02" is a valid ASM diks
                       ||||||||
                       ||||||||
                       ||||||||=====>Output Truncated (Do it for all necessary disk and only on Node 1)
                       ||||||||
                       ||||||||

[root@SajidServer01 ~]# ls -l /dev/oracleasm/disks*
brw-rw---- 1 grid asmadmin 252,  3 Nov 25 10:55 DATA01
brw-rw---- 1 grid asmadmin 252, 10 Nov 25 10:55 DATA02
brw-rw---- 1 grid asmadmin 252, 14 Nov 25 10:55 DATA03
brw-rw---- 1 grid asmadmin 252, 16 Nov 25 10:55 DATA04
brw-rw---- 1 grid asmadmin 252, 20 Nov 25 10:55 DATA05

Now on the rest of the RAC nodes just scandisk to discover the disk thats the added beauty back from 11g.

[root@SajidServer02 ~]# /etc/init.d/oracleasm scandisks
Scanning the system fro Oracle ASMLIB disk:       [  OK  ]

You can find the disk now
[root@SajidServer02 ~]# ls -l /dev/oracleasm/disks*
brw-rw---- 1 grid asmadmin 252,  3 Nov 25 10:55 DATA01
brw-rw---- 1 grid asmadmin 252, 10 Nov 25 10:55 DATA02
brw-rw---- 1 grid asmadmin 252, 14 Nov 25 10:55 DATA03
brw-rw---- 1 grid asmadmin 252, 16 Nov 25 10:55 DATA04
brw-rw---- 1 grid asmadmin 252, 20 Nov 25 10:55 DATA05

Now you can say your disk's are using MUTIPATH !!!


Friday, October 30, 2015

How to Increase or Add Redo Log Files in RAC Environment


Sometime DBA'S need to work on the task to increase the size of the redologs based on requirement of more data being pushed on. The procedure remain the same if you working on RAC environment for ODA'S and EXADATA machines the slightest difference you will be looking is some varied diskgroup names DATA, RECO and DBFS.

#####################
Script to check Redo logs
#####################
spool redologs.txt
set echo off
set feedback off
set linesize 120
set pagesize 35
set trim on
set trims on
set lines 120
col group# format 999
col thread# format 999
col member format a70 wrap
col status format a10
col archived format a10
col fsize format 999 heading "Size (MB)"

select l.group#, l.thread#,
f.member,
l.archived,
l.status,
(bytes/1024/1024) fsize
from
v$log l, v$logfile f
where f.group# = l.group#
order by 1,2
/
spool off

################
Output of the script
################

GROUP# THREAD# MEMBER                              ARCHIVED   STATUS     Size (MB)
------ ------- ---------------------------------- ---------- ---------- ---------
     1       1 +DG1/<DB Name>/ONLINELOG/group_1    YES        INACTIVE         100
     1       1 +DG2/<DB Name>/ONLINELOG/group_1    YES        INACTIVE         100
     2       1 +DG1/<DB Name>/ONLINELOG/group_2    YES        INACTIVE         100
     2       1 +DG2/<DB Name>/ONLINELOG/group_2    YES        INACTIVE         100
     3       2 +DG1/<DB Name>/ONLINELOG/group_3    NO         CURRENT          100
     3       2 +DG2/<DB Name>/ONLINELOG/group_3    NO         CURRENT          100
     4       2 +DG1/<DB Name>/ONLINELOG/group_4    YES        UNUSED           100
     4       2 +DG2/<DB Name>/ONLINELOG/group_4    YES        UNUSED           100
     5       3 +DG1/<DB Name>/ONLINELOG/group_5    YES        UNUSED           100
     5       3 +DG2/<DB Name>/ONLINELOG/group_5    YES        UNUSED           100
     6       3 +DG1/<DB Name>/ONLINELOG/group_6    YES        UNUSED           100
     6       3 +DG2/<DB Name>/ONLINELOG/group_6    YES        UNUSED           100

#############
Add Redo Logs
#############

First Add or Resize the redo logs depending on your requirement . You can drop the redologs later, once the addition is done.

alter database add logfile thread 1 group 7 ('+DG1','+DG2') size  250M;
alter database add logfile thread 1 group 8 ('+DG1','+DG2') size  250M;
alter database add logfile thread 2 group 9 ('+DG1','+DG2') size  250M;
alter database add logfile thread 2 group 10 ('+DG1','+DG2') size  250M;
alter database add logfile thread 3 group 11 ('+DG1','+DG2') size  250M;
alter database add logfile thread 3 group 12 ('+DG1','+DG2') size  250M;

###########
Log Switch
###########

Do the log switch to and ensure the status is in INACTIVE state before you drop the redo logs. Use the below commannds to change the state of logfiles.

alter system switch logfile;
alter system checkpoint;
alter system checkpoint global;


Once you find the logfile in INACTIVE state drop them using the below command:
ex: alter database drop logfile group 1;   =====> Whichever is in INACTIVE state.

#############
Desired Result
#############

Use the same script mentioned above to crosscheck your output

GROUP# THREAD# MEMBER                              ARCHIVED   STATUS     Size (MB)
------ ------- ---------------------------------- ---------- ---------- ---------
     7       1 +DG1/<DB Name>/ONLINELOG/group_7     YES        INACTIVE         250
     7       1 +DG2/<DB Name>/ONLINELOG/group_7     YES        INACTIVE         250
     8       1 +DG1/<DB Name>/ONLINELOG/group_8     YES        INACTIVE         250
     8       1 +DG2/<DB Name>/ONLINELOG/group_8     YES        INACTIVE         250
     9       2 +DG1/<DB Name>/ONLINELOG/group_9     NO         CURRENT          250
     9       2 +DG2/<DB Name>/ONLINELOG/group_9     NO         CURRENT          250
    10       2 +DG1/<DB Name>/ONLINELOG/group_10    YES        UNUSED           250
    10       2 +DG2/<DB Name>/ONLINELOG/group_10    YES        UNUSED           250
    11       3 +DG1/<DB Name>/ONLINELOG/group_11    YES        UNUSED           250
    11       3 +DG2/<DB Name>/ONLINELOG/group_11    YES        UNUSED           250
    12       3 +DG1/<DB Name>/ONLINELOG/group_12    YES        UNUSED           250
    12       3 +DG2/<DB Name>/ONLINELOG/group_12    YES        UNUSED           250


You are DONE with Addition and resize of redolog groups.

#############
More Thoughts
#############

You may get through these errors when you are not properly executing the redo logs tasks. These can be ignored.

SYS@<DB Name>1>alter database drop logfile group 7;
alter database drop logfile group 7
*
ERROR at line 1:
ORA-01624: log 7 needed for crash recovery of Name <DB Name> (thread 2)
ORA-00312: online log 7 thread 2: '+DG1/<DB Name>/ONLINELOG/group_7.'
ORA-00312: online log 7 thread 2: '+DG2/<DB Name>/ONLINELOG/group_7.'

SYS@<DB Name>1>
alter database drop logfile group 12;SYS@<DB Name>1>
alter database drop logfile group 12
*
ERROR at line 1:
ORA-01567: dropping log 12 would leave less than 2 log files for <DB Name> <DB Name>3 (thread 3)
ORA-00312: online log 12 thread 3: '+DG1/<DB Name>/ONLINELOG/group_12.'
ORA-00312: online log 12 thread 3: '+DG2/<DB Name>/ONLINELOG/group_12.'

########################
Work Arounds for Errors
########################

PRCR-1079 : Failed to start resource ora.dbname.db
CRS-5017: The resource action "ora.dbname.db start" encountered the following error:
ORA-01618: redo thread 3 is not enabled - cannot mount
. For details refer to "(:CLSN00107:)" in crsd trace file

CRS-2674: Start of 'ora.dbaname.db' on 'node03' failed
CRS-5017: The resource action "ora.dbname.db start" encountered the following error:
ORA-01618: redo thread 4 is not enabled - cannot mount
. For details refer to "(:CLSN00107:)" in crsd trace

SQL> alter database enable public thread 3;

This will resolve the issue. Hurray!!!!!!!!!!


Thursday, September 24, 2015

Oracle 12c Linux client 64 bit step by step install (12.1.0.2)


Create a staging directory on your application server and download the files from OTN. Make sure to set the profiles perfectly for the database and you do have all the directories set with right permissions. Check the RPM’s based on you operating system stipulations.

You can install client based on your requirements below are the install types and space requirements.


Once you log on to the machine

[Sajid@Sajid Server stage]$ ls
linuxamd64_12102_client.zip
[Sajid@Sajid Server stage]$ unzip linuxamd64_12102_client.zip 
[Sajid@Sajid Server stage]$ ls
client
[Sajid@Sajid Server client]$ ls
-rwxrwxr-x  1 oracle oinstall  500 Feb  6  2013 welcome.html
-rwxr-xr-x  1 oracle oinstall 8537 Jul  7  2014 runInstaller
drwxr-xr-x  4 oracle oinstall 4096 Jul  7  2014 install
drwxrwxr-x  2 oracle oinstall 4096 Jul  7  2014 response
drwxr-xr-x 14 oracle oinstall 4096 Jul  7  2014 stage


Select the install method and hit next. Most of the shops opt for Administrator, you can even proceedwith instant client and runtime. If you like to add some custom parameters you need to choose custom as of now I am choosing Adminitrator.


Select language and hit Next


Select appropriate Oracle base and Software location and hit next


Save the response file in case you would like to do silent install for any other fresh installs.


Your client is installed successfully. Update your tnsnames.ora file and test your database connection.

sqlplus username/password@<Server Name>/<DB Name>


The above screen will pop up when you do custom install all the rest of the steps are pretty much similar to Administrator but her you can choose any components based on your requirement.


Tuesday, September 22, 2015

Step by Step Oracle 12c Database Installation with Screenshots (12.1.0.2)

Create a staging directory on your server and download the files from OTN. Make sure to set the profiles perfectly for the database and you do have all the directories set with right permissions. Check the RPM’s based on you operating system stipulations.
p17694377_121020_Linux-x86-64_1of8.zip
p17694377_121020_Linux-x86-64_2of8.zip

[Sajid@SajidServer~]$ cd /u01/stage
[Sajid@SajidServer stage]$ ls -ltr
-rwxrwxr-x 1 oracle oinstall 1673517582 Sep 01 17:04 p17694377_121020_Linux-x86-64_1of8.zip
-rwxrwxr-x 1 oracle oinstall 1014527110 Sep 01 17:04 p17694377_121020_Linux-x86-64_2of8.zip
[Sajid@SajidServer stage]$ unzip p17694377_121020_Linux-x86-64_1of8.zip
[Sajid@SajidServer stage]$ unzip p17694377_121020_Linux-x86-64_2of8.zip
[Sajid@SajidServer stage]$ ls -ltr
-rwxrwxr-x 1 oracle oinstall 1673517582 Sep 01 17:04 p17694377_121020_Linux-x86-64_1of8.zip
-rwxrwxr-x 1 oracle oinstall 1014527110 Sep 01 17:04 p17694377_121020_Linux-x86-64_2of8.zip
drwxrwxr-x 7 oracle oinstall       4096 Jul 01  2014 database
[Sajid@SajidServer stage]$ cd database

Make sure you have your VNC or XMING set up properly and now invoke the runInstaller

[Sajid@SajidServer database]$ ./runInstaller


Untick the box I wish to receive security updates via My Oracle Support

Select Yes and hit Next

Select Install Database Software only

Select Single Instance database installation


Select the language and Hit Next

Select database edition and hit Next

Set the Oracle Base and Software Location as per your shop

Select the group as Oinstall. Look for the Prerequisite check and look for if you want to set at this time and hit next. At this point you will be done with the Software Installation.
Invoke dbca from your server and if the profiles are set properly it will take you to the next screen.

Select Create Database and hit Next


Select Advanced Mode and hit next. You can even go with Create database with default settings depending on your requirement.


Select General Purpose or Transactional Processing and hit Next

Enter the Global Database Name and SID. Check the Create As Container Database and select create a container database with one or more PDBs and enter the PDB name. You can make changes depending upon your requirements and hit Next.


You can Configure Enterprise Manager (EM) Database Express based on your needs and hit Next

You can choose separate passwords or use same passwords and hit Next

Select the Listener Name and Listener Port as per your requirements and hit Next

You can Enable Archiving and even specify Fast Recovery Area based on your prerequisites and hit Next

On Location give the path of your archive log location if you are willing to and hit Ok

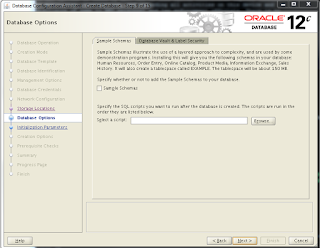
You can select sample schemas if not even leave it and hit Next

Set the Memory values based on you specifications after it in the same window select Sizing

Enter the process and hit Character Set

Choose the options on stipulation and hit Connection Mode

Choose an option and now hit Next

Now you can Create Database and even save the template with database creation scripts. Select Customize Storage Settings.


Set the location for Control File and hit Apply


Select Datafiles and hit Apply

Set the Redo logs properly and hit Apply and now hit Next


You can check the Activity log and Alert log for errors


Now your Database is Created.